In the context of fitness, periodisation means changes in intensity, volume and frequency of training over a period of time. These factors are systematically structured to avoid over-training and produce greatest results. The ancient Greeks first used periodisation to prepare their athletes for the Olympics. Milo of Croton changed intensity over time by lifting a bull-calf on a daily basis until it had reached full maturity. Although this basic periodisation plan was completed by default Milo never lost a wrestling match in five consecutive Olympics. Modern periodisation wasn’t really defined until the 1970’s. This was due, at least in part, to some groundbreaking research by the noted physiologist Hans Selye, who ultimately formulated what he called the ‘general-adaptation syndrome’. According to this theory the body responds to ‘stressors’ (environmental stress) by adapting to meet the demands (it adapts by improving). When the adaptive response is reached the body stops changing until a new type of stress is introduced to produce further adaptation. Therefore periodisation introduces ever-changing stressors to produce maximum results.
Two main training philosophies are linear and non-linear periodisation. Linear periodisation generally consists of microcycles of 3-4 weeks and is completed in succession. An example of this would be hypertrophy training for 3 weeks, strength training for 3 weeks followed by power training for a further 3 weeks. This type of periodisation training is great for sports that have definable competition periods 3-4 times per year. Non-linear periodisation has dramatic changes that occur within a weeklong training cycle. An example would be Monday hypertrophy training, Wednesday strength training and Friday power training. Non-linear periodisation is best used by sports with long seasons and frequent competitions.
Non-linear periodisation is also best used by individuals with no competition goals but physical goals such as weight loss. Researchers from Arizona State University found during a 12-week study that a non-linear trained group improved 29% (Bench press) and 56% (Leg press) compared to 14% (Bench press) and 26% (Leg press) in the linear trained group. Another advantage of non-linear periodisation is the variety in a training week, which reduces the boredom often seen in gym-based programmes. Although non-linear periodisation is best suited for the non-athlete there is nothing stopping you trying linear periodisation. Always seek help from a qualified instructor or personal trainer when designing a new programme.

The Non-linear Periodisation Programme
Before commencing this programme seek clearance from a medical practitioner. A six-week conditioning programme designed by a qualified instructor should be completed before commencing this programme.
The following programme is an example of an all-over body resistance programme. This programme is only one example of many that can utilise non-linear periodisation. The programme should be followed for no more than 4 weeks. After completion, seek help from a qualified instructor or personal trainer for a change of programme.
The non-linear periodisation plan
Workout Type Sets Reps Load Tempo Rest
1 Mass 3 12-8 Med 1,0,2 60sec
2 Strength 3 8-6 High 2,1,2 180sec
3 Endurance 4 25-20 Low 1,0,2 30sec
4 Power 3 15-12 Med 1,0,1 60sec
All four workouts should be completed in order once per week. Follow the exercises listed in the programme, change the variables listed in the table from workout to workout. All four workouts should be completed in order once per week. A warm-up of 5-10 min cardio should be completed at the start of the workout. A warm down and full body stretch session should be completed at the end. A possible workout plan could be:
Monday Workout 1
Tuesday Workout 2
Wednesday Cardio and core work
Thursday Workout 3
Friday Cardio and core work
Saturday Workout 4
Sunday Rest
The Exercises
Do not hold your breath, breath out on exertion. Select a load suitable for the rep range. Maintain technique throughout exercise, once you lose your technique stop!
1. Front Squats
 Starting position
Feet should be between hip and shoulder width apart, toes forward and slightly outward. Keep elbows high, eyes on the horizon and the chest up. Move with hips first then knees. Squat as if sitting into a chair, keeping the abdominals strong. Stop decent if the heels start to rise or the pelvis tilts backward. Stop when the thighs are parallel to the floor.
Up phase
Drive through your heels using your glutes and quads. Keep eyes on the horizon, abdominals strong and the chest up throughout the movement. Do not lock your knees at the top of the movement.
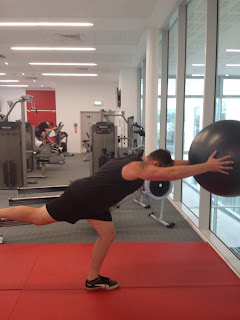
2. Swiss ball Lunge
Start position
Place back leg flat on Swiss ball. Keep feet parallel and hips facing forward throughout the entire movement. Keep eyes on the horizon and the chest up throughout the exercise. Bend both knees simultaneously, do not let the knees travel over the toes.
Up phase
Return to starting position, finish rep range on one side then swap sides.
3. Swiss ball Chest Dumbbell Press
Starting position
Sit on Swiss ball with dumbbells on your thighs. Slowly roll down ball keeping your hips parallel with the floor. Stop when the head and neck are resting on the ball in a neutral position.
Down phase
Hold the dumbbells so your elbows are directly in-line with your hands. Keep the back and neck in a neutral position throughout the entire lift. Slowly lower the dumbbells until your arms are just past 90 degrees from your shoulders.
Up phase
Return the dumbbells to the starting position, do not lock elbows at the top of the lift.
4. One Arm Row
Starting position
Place one knee and one hand on the Swiss ball. Keep the back and neck in a neutral position. Start with the dumbbell at your side without dropping your shoulder.
Up phase
Raise the dumbbell to the side of your stomach, keeping your elbow close to your side. Do not twist your back to raise the dumbbell. Once rep range has been reached swap sides.
5. Standing Dumbbell Shoulder Press
Up phase
Feet should be between hip and shoulder width apart, toes forward and slightly outward. Hold the dumbbells slightly forward and to the outside of your shoulders. Keep the back and neck in a neutral position and abdominals strong throughout the entire lift. Press the dumbbell above your head while keeping your elbows slightly forward of your body. Do not let the dumbbells touch at the top of the movement.
Down phase
Slowly lower the dumbbells to the starting position. You control the dumbbells decent do not let gravity lower the dumbbells.
Personal Trainer
M: 07511468490
E: rlbodytrainer@gmail.com
Facebook: https://www.facebook.com/rlbodytrainer
Twitter: @LesmillsPT